
To install a downpipe on your Dodge Challenger R/T, start by gathering the right tools like a socket set, ratchet, penetrating oil, and new gaskets. Carefully lift your vehicle and disconnect the stock downpipe, then slide the new one into position, making sure all connections are tight and properly aligned. Double-check for leaks and secure everything before taking your car for a test drive. For detailed steps, continue exploring the process below.
Key Takeaways
- Gather necessary tools, parts, and ensure vehicle is cool, lifted, and secured before starting the installation.
- Carefully remove the stock downpipe using penetrating oil and proper tools to disconnect clamps and bolts.
- Align and connect the aftermarket downpipe, ensuring proper gasket seating and secure fitment.
- Check all connections for leaks, proper torque, and clearance before finalizing the installation.
- Perform a test drive to verify performance, sound, and ensure no exhaust leaks or unusual noises.
Tools and Parts Needed for the Installation

Before beginning your downpipe installation on the Dodge Challenger R/T, it’s crucial to gather all the necessary tools and parts. You’ll need a socket set, wrenches, and a ratchet for removing and tightening bolts. A jack and jack stands are essential for safely lifting your vehicle. Don’t forget penetrating oil to loosen rusted nuts, along with a torque wrench to ensure proper tightening. Ensuring you have the correct type of essential oils can assist in maintaining your vehicle’s performance and longevity. You’ll also require new gaskets and clamps to secure the downpipe properly. It’s helpful to have rubber gloves and safety glasses for protection. Double-check that you have the correct downpipe designed for your Challenger R/T. Having all these tools and parts ready will make the installation smoother, quicker, and safer. Additionally, consulting the best airless paint sprayer models can provide insights into efficient tools for future projects, ensuring you’re well-equipped for any vehicle or home improvement task. Proper planning and having the right specialized tools can greatly reduce installation time and effort. Being aware of local laws and regulations regarding vehicle modifications can also help you avoid potential legal issues. Also, reviewing vehicle repair guides can offer valuable tips specific to your model.
Preparing Your Dodge Challenger R/T for Downpipe Installation

To guarantee a smooth downpipe installation on your Dodge Challenger R/T, start by parking your vehicle on a flat surface and engaging the parking brake. Ensure the engine is cool before working underneath to avoid burns and injuries. Open the hood and disconnect the negative battery terminal to prevent electrical issues. Gather all necessary tools and parts, double-checking you have everything ready. Loosen the lug nuts on the wheels if you plan to lift the vehicle for easier access. Lift the car using a jack and secure it with jack stands. Clear the workspace of any clutter to prevent accidents. Taking these precautions ensures a safer, more efficient installation process and helps you avoid unnecessary delays or issues during the downpipe replacement. Being aware of proper manual flushing techniques can also prevent unexpected issues while working on your vehicle. Additionally, understanding relationship dynamics can help maintain harmony during your repair projects.
Removing the Stock Downpipe Safely
Before removing the stock downpipe, gather all the necessary tools to guarantee a smooth process. Next, locate and carefully release the exhaust clamps holding the downpipe in place. Taking these steps helps you remove the downpipe safely and efficiently. Additionally, understanding the system security assessment aspect ensures you approach the removal with caution to prevent accidental damage or security vulnerabilities. Being aware of financial considerations for elderly care can also help plan for any unexpected expenses during maintenance or upgrades. Incorporating a mental wellbeing index assessment into your planning can help ensure a balanced approach to vehicle maintenance and personal stress management. Embracing a growth mindset during this process can also improve your problem-solving and adaptability if unforeseen challenges arise. Considering the weight of wind turbine blades can be a useful analogy for understanding the importance of proper handling and safety measures during removal procedures.
Collect Necessary Tools
Gathering the right tools is vital to remove the stock downpipe safely and efficiently. Start with a socket set, including both metric and standard sizes, to handle various bolts. A ratchet wrench will make loosening difficult fasteners easier. You’ll also need penetrating oil to loosen rusted or stuck bolts. A breaker bar can provide extra leverage for stubborn connections. Safety gloves and eye protection are indispensable to protect against debris and hot surfaces. A torque wrench is helpful if you plan to reinstall or replace parts with specific torque specifications. Additionally, having a flashlight or work light ensures clear visibility in tight or poorly lit areas. Properly understanding the horsepower of your vehicle can help determine the appropriate tools and techniques for the job. Considering the type of vehicle can influence the choice of tools and approach, especially for performance modifications. Being familiar with the exhaust system layout makes the removal process smoother and safer. Preparing these tools beforehand keeps the process smooth, minimizes frustration, and helps you complete the task safely.
Release Exhaust Clamps
Since exhaust clamps secure the downpipe to the exhaust system, carefully releasing them is essential to prevent damage or injury. Start by inspecting the clamps for rust or corrosion, which may make removal tricky. Use a penetrating oil if needed to loosen stuck clamps. Keep in mind that appliance maintenance plans can help prevent issues with tools or equipment used during the process, ensuring a smoother removal. Next, grab the appropriate wrench or socket to loosen the clamp bolts. Be cautious when loosening, as residual pressure or heat can cause sudden movement. It’s also important to verify that the proper safety precautions are in place before proceeding. Once the clamps are free, gently wiggle the downpipe to detach it from the exhaust system. Applying some lubrication techniques can facilitate easier removal if resistance is felt. Additionally, understanding exhaust system components can help identify potential complications during removal. Recognizing common removal challenges can prepare you for unexpected issues. Keep the clamps in a safe place if you plan to reuse them. Removing the clamps smoothly prevents damage to the exhaust components and ensures a safer, cleaner installation process for your new downpipe.
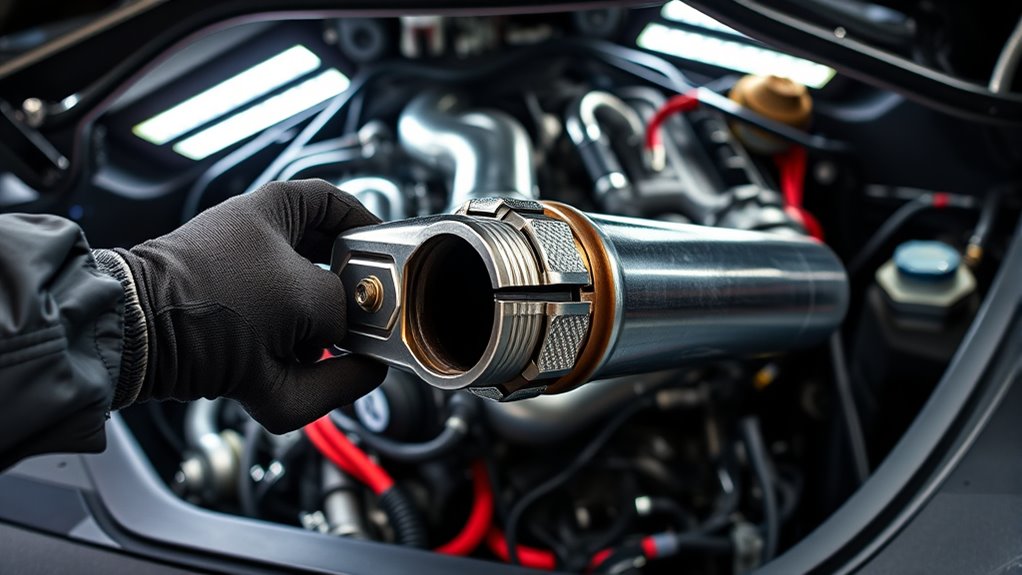
Installing the Aftermarket Downpipe

Installing the aftermarket downpipe on your Dodge Challenger R/T is a straightforward process that can considerably improve exhaust flow and performance. Begin by ensuring the vehicle is cool and safely lifted, then remove the factory downpipe by loosening the bolts and disconnecting any sensors or brackets. Next, carefully slide the new downpipe into place, aligning it with the existing exhaust system. Use the provided gaskets and hardware to secure it tightly, making sure all connections are snug. Keep in mind, you might need to adjust or remove other components for a proper fit. Take your time to ensure everything lines up correctly. Once installed, double-check all bolts and connections before lowering your car. This upgrade enhances exhaust flow, providing a noticeable boost in power and sound. Proper installation techniques are vital to ensure optimal performance and prevent leaks, especially when considering exhaust system modifications for your vehicle. Additionally, ensuring all components are correctly torqued and sealed will help maintain drivetrain integrity over time. Incorporating performance tuning after installation can further maximize the benefits of your upgraded exhaust system. To achieve these results, paying attention to spatial alignment during installation can be crucial for ensuring a secure fit.
Checking for Proper Fitment and Connections

To guarantee your downpipe is properly fitted and all connections are secure, start by visually inspecting each joint and flange for gaps or misalignment. A thorough check can help prevent potential leaks and ensure optimal exhaust flow. Make certain all clamps and bolts are tight and properly seated to prevent leaks or exhaust leaks. Check that the downpipe aligns smoothly with the factory components, avoiding any kinks or stress points. Confirm that the gasket surfaces are clean and seated correctly. Use a flashlight if needed to verify no gaps or loose connections. Proper fitment is crucial for maintaining performance and avoiding costly repairs down the line. – Verify all clamps are tight and evenly secured – Confirm the downpipe is aligned with the exhaust system – Inspect for any visible gaps or misfits at joints – Ensure gaskets are properly seated and clean
Final Inspection and Test Drive Tips

Before taking your Dodge Challenger R/T out for a test drive, it’s essential to perform a thorough final inspection. Start by checking all clamps and bolts to ensure they’re tight and secure.
Listen for any unusual sounds like rattling or exhaust leaks while idling. Inspect the connections for proper fitment, making sure there’s no exhaust leakage.
Confirm that the downpipe is correctly aligned and that no parts are touching the chassis or other components.
Before hitting the road, clear any tools or debris from the engine bay.
During your test drive, accelerate gradually and pay attention to how the car responds. Notice any change in sound or performance.
If everything feels smooth and there are no leaks or strange noises, you’re good to go.
Frequently Asked Questions
How Does a Downpipe Affect My Dodge Challenger R/T’s Horsepower?
You might think adding a downpipe won’t make much difference, but it actually boosts your Dodge Challenger R/T’s horsepower. By reducing exhaust backpressure, a downpipe allows the engine to breathe better, increasing power and torque.
This upgrade doesn’t just improve performance; it also enhances engine sound. Keep in mind, though, for maximum gains, consider pairing it with other modifications and check local emissions regulations to stay compliant.
Can I Install a Downpipe Without Professional Help?
You can install a downpipe yourself, but it’s not always straightforward. If you have mechanical experience and the right tools, you might manage it, but keep in mind that working under your car can be challenging.
You’ll need to follow proper procedures, including disconnecting components and ensuring everything is fitted correctly. If you’re unsure, it’s safer to seek professional help to avoid damaging your vehicle or causing installation issues.
Will Installing a Downpipe Void My Vehicle’S Warranty?
Wondering whether your warranty will waver with a wild, aftermarket upgrade? Installing a downpipe can potentially void your Dodge Challenger R/T’s warranty if it’s linked to emissions or engine performance issues.
However, if you keep the installation compliant and retain factory parts, you might avoid warranty woes. Always check your warranty’s fine print and consult your dealer before making modifications, so you don’t unintentionally invalidate your vehicle’s coverage.
What Are the Benefits of a High-Flow Catalytic Converter?
A high-flow catalytic converter improves your vehicle’s exhaust flow, which boosts performance and horsepower. It reduces backpressure, helping your engine breathe better and potentially increasing fuel efficiency.
Additionally, it can minimize emissions without sacrificing power. You’ll notice quicker throttle response and smoother acceleration.
How Often Should I Inspect My Downpipe for Wear and Tear?
You should inspect your downpipe regularly, ideally every 10,000 to 15,000 miles or if you notice any unusual noises or performance issues.
Look for cracks, rust, or loose connections that could affect your vehicle’s performance and safety. Regular inspections help catch problems early, preventing costly repairs later.
Keep an eye on the system’s condition to guarantee peak airflow and maintain your car’s power and efficiency.
Conclusion
Congratulations, you’ve now upgraded your Dodge Challenger R/T’s exhaust! Who knew that swapping a downpipe could feel like a major victory? Just remember, all that extra horsepower might make everyday drives a tad more exciting—so stay safe out there. After all, it’s funny how a simple part change can turn your daily commute into a near-race experience. Enjoy the roar, and don’t forget to keep an ear out for any unexpected sounds!

Ethan is at the forefront of hybrid vehicle technology, making him an invaluable resource for our readers interested in hybrid tuning. His expertise in electric motor upgrades, battery systems, and regenerative braking allows him to provide cutting-edge advice on optimizing hybrid vehicles for performance and efficiency. Ethan’s work ensures that our content stays ahead of the curve in the rapidly evolving world of hybrid technology.