
TL;DR
Moving your rig into a closet with proper treatment and sealing can drastically cut noise and improve sound quality. Focus on placement, sealing gaps, and ventilation for the best results—foam alone won’t do it.
Think a closet is just a tiny, echoey box? Think again. With the right tweaks, it can be your best friend for quiet, focused recordings or streaming. The secret isn’t just adding foam—it’s about where you place your gear, how you seal gaps, and making sure it stays cool. You can learn more about acoustic dampening, placement, and the “Rig in the Closet” setup.
In this guide, you’ll learn how a simple closet can become a surprisingly effective sound shield, and why moving your rig away from your workspace might be the smartest move you make.
Acoustic dampening
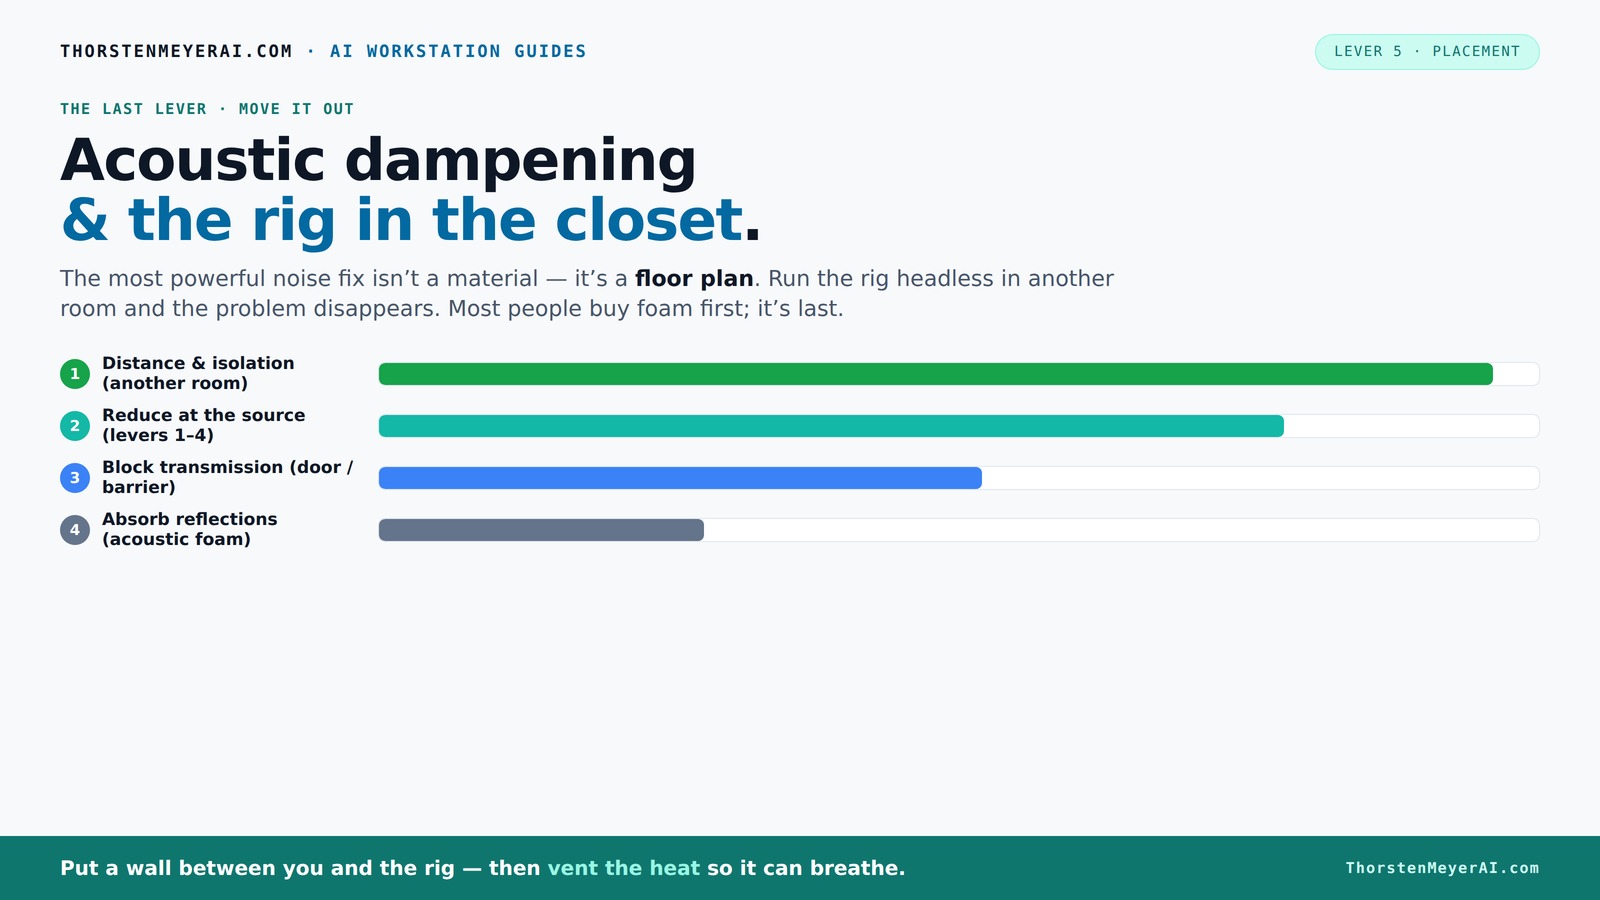
& the rig in the closet.
The most powerful noise fix isn’t a material — it’s a floor plan. A rig you can’t hear because it’s in another room beats any amount of foam. Tap the approaches in Part 1 to see what actually works.
(another room)
(levers 1–4)
(door / barrier)
(acoustic foam)
Contain the noise, not the heat
Key Takeaways
- Moving your rig to another room or closet can cut noise by over 80%, making it the most effective fix.
- Proper ventilation is critical in enclosed spaces—without airflow, your machine overheats and fans roar louder.
- Sealing gaps around doors and walls is essential—foam alone won’t block sound leaks.
- Focus on reflection points—back wall, side walls, ceiling—rather than covering every surface blindly.
- Layering materials like foam, blankets, and bass traps yields the best sound absorption across frequencies.

24 Pack Black 12 x 12 x 2 Inches Pyramid Designed Acoustic Foam Panels, Sound Proof Foam Panels for Walls, High Density and Flame-Retardant Acoustic Panels, Sound Panels for Recording and Home Studio
- Effective Sound Absorption: Reduces echo and reverberation
- High-Quality Material: Durable, flame-retardant acoustic foam
- Stylish Pyramid Design: Enhances sound diffusion and decor
As an affiliate, we earn on qualifying purchases.
As an affiliate, we earn on qualifying purchases.
Why Moving Your Rig Is the Biggest Noise Fix You Can Make
Distance is your best friend in noise reduction. When you put your AI rig or gaming PC in another room—say, a basement or closet—the sound just doesn’t reach you. No matter how loud it roars, your workspace stays silent. It’s the simplest, cheapest, most effective fix.
Imagine working on a project, chatting on Zoom, and not hearing your GPU’s fan spin up. That’s the power of separation. Plus, with a wired connection or strong Wi-Fi, your remote setup feels seamless. Your PC can be in a closet, while you work comfortably at your desk.
So, if noise is your main concern, start here: move it out of sight and earshot. Your productivity and sanity will thank you.
The 'Rig in the Closet' Setup — How to Keep It Cool and Quiet
Putting a high-performance machine in a closet sounds perfect—until it overheats. The key is airflow. You need a way for hot air to escape and cool air to enter. Otherwise, the temperature climbs, fans spin louder, and your noise problem worsens.
Use passive vents or quiet exhaust fans. Many DIY builders use weatherstripping and ducting to seal gaps, then add a small, quiet fan to draw heat out. For serious setups, a purpose-built soundproof cabinet with active ventilation can keep temps stable while muffling noise. Check out this guide on reducing heat and noise in your AI workstation.
Check out this guide on reducing heat and noise in your AI workstation. It covers everything from airflow to cooling options, making sure your closet stays cool without turning into a furnace.
Understanding the importance of proper ventilation is crucial because heat buildup can cause hardware throttling, reduce lifespan, and increase noise levels due to fans running at higher speeds. The tradeoff is between maintaining adequate airflow to keep your equipment cool and minimizing noise from fans. For more insights, see this guide on acoustic treatment and setup.
Acoustic Dampening vs. Soundproofing: What Your Closet Really Needs
Acoustic dampening and soundproofing aren’t the same. Dampening reduces echo and reflections inside the space—think of it as making the sound less boomy. Soundproofing blocks sound from escaping or entering—like adding a wall.
In a closet, dampening might mean foam panels, blankets, or rugs that soften reflections. Soundproofing involves sealing gaps, adding mass, or constructing a barrier. For more on soundproofing techniques, visit this article on acoustic treatment.
Remember, foam alone doesn’t stop sound from leaking out. It just makes the inside sound nicer. To truly block noise, focus on sealing cracks, doors, and adding mass where possible.
Understanding this distinction helps you allocate your budget and effort effectively. For example, if your goal is to prevent noise from escaping, prioritize sealing gaps first. If your main concern is improving audio clarity within the space, dampening is more critical. Combining both approaches ensures your closet is both a good recording environment and a quiet space for others.
Placement Matters: How to Strategically Treat Your Closet for Best Results
Effective treatment isn’t about covering every inch blindly—it’s about targeting reflection points. The first reflection—where sound bounces directly from your mic to the wall—is the biggest culprit for echo and muddy recordings.
Start by placing absorption panels at the back wall behind the mic, then add panels at reflection points on side walls. The ceiling can also cause echoes, so consider some coverage overhead. The door and floor matter, too, especially if gaps let sound leak or bounce. For detailed treatment strategies, see this guide on acoustic placement.
For example, a creator might hang thick blankets over the door cracks, put foam panels at the mic’s reflection points, and add a rug on the floor. This layered approach makes a noticeable difference in clarity.
Understanding why certain points reflect sound helps you make smarter choices. Reflection points are where sound bounces directly from your source to surfaces that can cause echo or reverb. Treating these specific spots yields a more natural, clear sound without overdoing it. It’s a balance—too much treatment can deaden the sound, too little leaves it echoey. Focus on the most impactful reflection points for optimal results. Carefully selecting and treating these critical spots ensures you're not wasting resources on areas that contribute little to overall sound quality, and it helps maintain a natural, lively sound while reducing unwanted echo.
Sealing the Gaps: The Secret to Truly Quiet Closet Spaces
Sound leaks through cracks, gaps, and unsealed doors. Treating walls doesn’t help if your closet door is a sieve. Use weatherstripping, acoustic sealant, or blankets to seal every crack around hinges, handles, and gaps. Learn more about sealing gaps and acoustic treatment.
Example: Adding foam strips around the door frame can cut noise leaks by up to 70%. For bigger gaps, consider acoustic seals or even hanging a thick blanket to block sound. Every little crack counts.
Sealing gaps isn’t just about reducing noise; it also improves the effectiveness of your acoustic treatments. Gaps allow sound to escape or enter, defeating the purpose of your dampening efforts. Proper sealing creates a more controlled environment, which enhances both sound quality and noise isolation. Regularly check and maintain these seals, especially if your closet is inside a noisy room or if temperature fluctuations cause materials to shift. This proactive approach keeps your space consistently quiet and improves your overall setup’s performance. Effective sealing minimizes sound leakage, which is crucial because even small gaps can significantly undermine your efforts to create a quiet, controlled environment, especially in small spaces where sound can bounce around and escape through tiny openings.
Materials That Actually Work — Foam, Blankets, and More
Not all materials are created equal. Two-inch thick acoustic foam panels are great for reducing echoes at high frequencies but do little for bass or low-frequency noise. Thick blankets and rugs absorb more low-end energy and are cheap DIY solutions.
For serious control, layered materials work best: combine foam panels, heavy blankets, and bass traps in corners. Dense, soft, layered materials absorb sound more evenly across frequencies. For example, a thick quilt around the closet’s interior walls can significantly reduce reverb.
Understanding the strengths and limitations of different materials helps you make smarter choices. Foam is effective for managing high-frequency reflections but often insufficient for low-frequency noise, which is more problematic in small, enclosed spaces. Layering materials—such as placing foam panels on the walls, adding blankets over reflective surfaces, and installing bass traps in corners—creates a balanced absorption system. This layered approach reduces a broader range of frequencies, resulting in clearer recordings and less ambient noise. Be aware that some materials may introduce resonances or colorations if not used carefully, so testing different configurations helps optimize sound quality. Layering materials allows you to tailor your treatment to your specific acoustic needs, balancing cost, effort, and performance for the best results.
Mic Placement and Reflection Control in a Tiny Space
Your mic placement can make or break your sound. Keep the mic close—6 to 12 inches—to reduce room reflections. Position it equidistant from reflective surfaces to minimize echo and reverb.
Use the 'dead zone' behind the mic, which is often the reflection point where sound bounces back from the wall. Placing a foam panel or blanket directly behind the mic can absorb these reflections, making vocals clearer.
For example, a voiceover artist might position the mic near a wall covered with foam, with a reflection filter, and keep it away from windows or hard surfaces. The result? Crisp, focused recordings even in a tiny closet.
Understanding how sound interacts with your environment helps you position your mic for optimal clarity. The closer the mic is to your source, the less room sound it picks up, but too close can cause proximity effect or plosives. Using reflection filters and placing the mic at reflection points prevents sound bouncing back from surfaces, reducing echo. Experimenting with positioning based on your specific closet's shape and materials yields the best results. Think of it as tuning your environment for perfect capture—small adjustments can make a big difference.
Avoid Common Mistakes That Sabotage Your Closet Setup
Don’t overuse foam everywhere—this can make your space sound dull or boxy. Treat reflection points strategically instead. Also, don’t ignore the door or gaps; sound leaks out easily through unsealed cracks.
Another mistake: treating only corners. While bass traps help, wider coverage on walls and ceiling often yields better results. Finally, neglecting ventilation can cause heat buildup, leading to fan noise and potential damage.
For example, a creator sealed gaps around the door, added absorption panels at reflection points, and kept the mic close. The improvement was dramatic, with clearer vocals and less echo. Remember, the goal is to balance sound absorption with natural room acoustics; over-treating can deaden your sound and make recordings unnatural. Also, neglecting ventilation can lead to overheating, which in turn causes fans to run louder and risks hardware damage. Regularly evaluate your setup, make incremental improvements, and prioritize sealing and strategic placement for best results.
Budget Tiers: From Cheap Blankets to Professional Soundproof Rooms
Budget options vary from a few blankets and rugs to custom-built, insulated booths. For a zero-cost start, hang thick blankets over the door and walls. Use existing furniture or household materials to soften reflections.
Midrange involves buying foam panels, bass traps, and sealing gaps with weatherstripping. This can cost a few hundred dollars but dramatically improves sound quality.
High-end setups include custom soundproof cabinets with active ventilation, thick drywall, and damping layers. These are expensive but turn a closet into a near-studio environment.
Understanding your needs and budget helps you make informed choices. Even small investments in sealing gaps and adding targeted treatment can substantially improve your sound environment. For larger budgets, investing in specialized materials and construction yields near-professional results, but even modest efforts can make a big difference if executed thoughtfully. The key is balancing cost, effort, and desired outcome.
Choosing the Right Closet for Your Acoustic Needs
Size, shape, and door type matter. Smaller closets with flat walls are easier to treat but can cause bass issues. A closet with a solid door and minimal gaps is best for sealing.
For example, a small linen closet with a sturdy door can be turned into a decent vocal booth. Avoid closets with lots of vents or gaps unless you plan to seal or treat them.
Remember, a quieter room around the closet helps too. An interior closet inside a less noisy room is easier to treat and more effective.
Choosing the right closet involves understanding your space’s acoustics and limitations. Larger closets may require more treatment but can offer better sound isolation if properly sealed. Consider the existing door and wall quality—solid doors with minimal gaps are preferable. Also, think about the room environment—less ambient noise outside the closet makes it easier to achieve good results. Analyzing your specific needs and constraints will guide you toward the best choice for your setup.
Frequently Asked Questions
Can a closet really work as a recording booth?
Yes. With proper treatment, sealing gaps, and strategic mic placement, a closet can become a surprisingly effective recording space for vocals, voiceovers, or streaming. It’s all about managing reflections and leaks.
Is acoustic foam the same as soundproofing?
No. Acoustic foam reduces echoes and reflections inside a room but doesn’t block sound from escaping. Soundproofing involves sealing gaps, adding mass, and constructing barriers to prevent sound leaks.
Where should I place the mic inside a closet booth?
Place the mic close—about 6 to 12 inches from your mouth—and away from reflective surfaces. Use reflection filters and position the mic at reflection points on walls to minimize echo and get a focused, clear sound.
Should I treat the walls, door, ceiling, or floor first?
Start with sealing gaps around the door and walls. Then, target reflection points—back wall, side walls, and ceiling—using foam or blankets. Floor treatment helps if sound leaks or echoes are prominent there.
How much acoustic treatment do I need?
In small spaces, covering 20-30% of the wall area with panels is a solid start. For recording, focus on the reflection points, and layer materials for best low-frequency control. It’s better to treat selectively than cover blindly.
Conclusion
The biggest noise killer isn’t the gear itself—it's where you put it. Moving your rig into a well-sealed, ventilated closet can turn a noisy headache into a quiet, focused workspace. The secret is smart placement, sealing gaps, and layering your treatments.
So, next time your setup feels like a roaring beast, ask yourself: can I put it somewhere quieter? The answer might just transform your entire workflow.